Enable TCP Connection to SQL Server Express
Learn how to enable TCP/IP connections to SQL Server Express running locally on port 1433, allowing Quemsi and other applications to connect remotely
Introduction
By default, SQL Server Express often has TCP/IP connections disabled, which means applications like Quemsi cannot connect to it over the network, even from the same machine. This tutorial will guide you through enabling TCP/IP connections so you can connect to your SQL Server Express instance running on localhost port 1433.
Enabling TCP/IP is essential when you want to:
- Connect Quemsi to your SQL Server database
- Allow remote connections to your SQL Server instance
- Use connection strings with server names or IP addresses
- Enable network-based database management tools
Important Note
After enabling TCP/IP, you'll need to restart the SQL Server service for the changes to take effect. Make sure to save any work and plan for a brief service interruption.
Prerequisites
Before You Begin
Make sure you have the following:
- SQL Server Express installed and running on your local machine
- Administrator privileges on your Windows machine (required to modify SQL Server configuration)
- SQL Server Configuration Manager installed (usually comes with SQL Server Express)
- Knowledge of your SQL Server instance name (default is usually
SQLEXPRESS)
If you don't have SQL Server Configuration Manager installed, you can download it separately or reinstall SQL Server Express with the management tools option selected.
Step-by-Step Guide
Enable SQL Server and Windows Authentication Mode
First, you need to enable SQL Server Authentication mode to allow password-based connections:
- Open SQL Server Management Studio (SSMS)
- Connect to your SQL Server instance using Windows Authentication
- Right-click on your server instance in Object Explorer and select "Properties"
- In the Server Properties dialog, go to the "Security" page
- Under "Server authentication", select "SQL Server and Windows Authentication mode"
- Click "OK" to save the changes
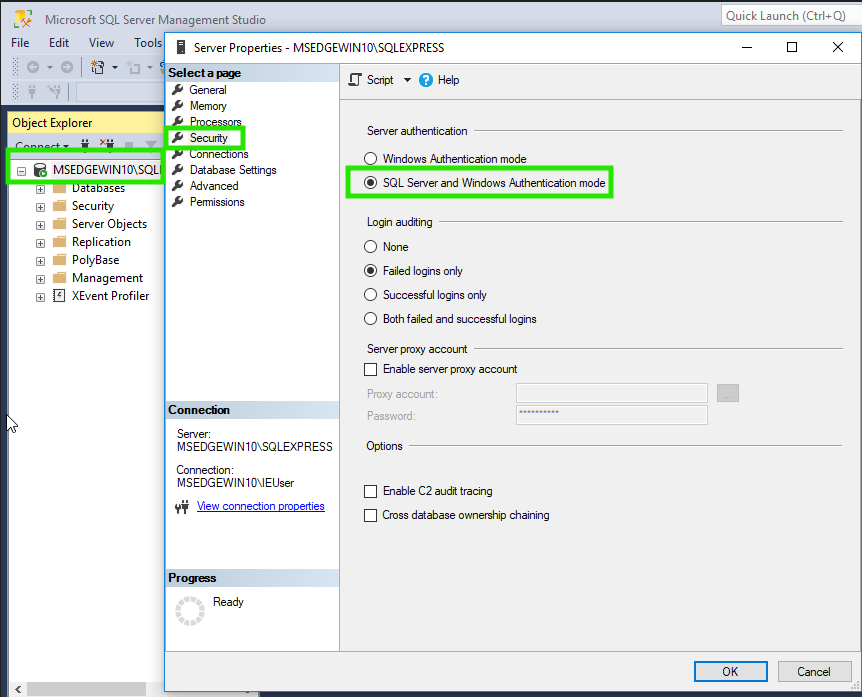
Server Properties Security page with SQL Server and Windows Authentication mode selected
Important
After changing the authentication mode, you must restart the SQL Server service for the changes to take effect. But its best to this after completing all the other steps.
Set Password for sa User
Now set a password for the sa (system administrator) account:
- In SQL Server Management Studio, expand your server instance in Object Explorer
- Expand "Security" → "Logins"
- Right-click on "sa" and select "Properties"
- In the Login Properties dialog, go to the "General" page
- Enter a strong password in the "Password" field
- Confirm the password in the "Confirm password" field
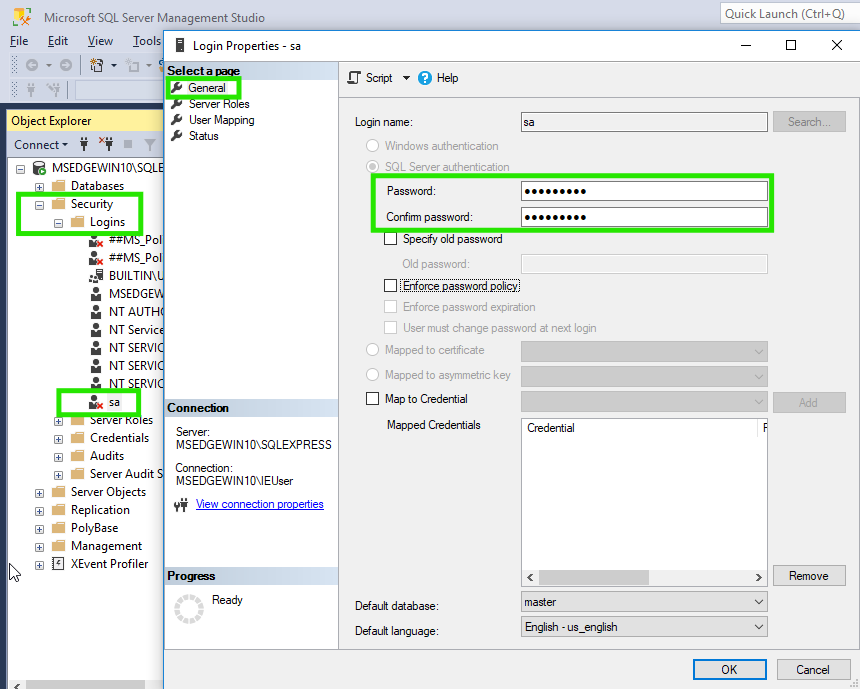
Login Properties dialog showing password fields for sa user
Password Security
Choose a strong password for the sa account. This account has full administrative privileges, so it's important to use a secure password. Consider creating a different account with less privileges for day to day use.
Enable sa User in Status Tab
Enable and grant permissions to the sa user:
- Select "Status" tab in the sa Login Properties dialog
- Under "Login", select "Enabled"
- Under "Permission to connect to database engine", select "Grant"
- Click "OK" to save the changes
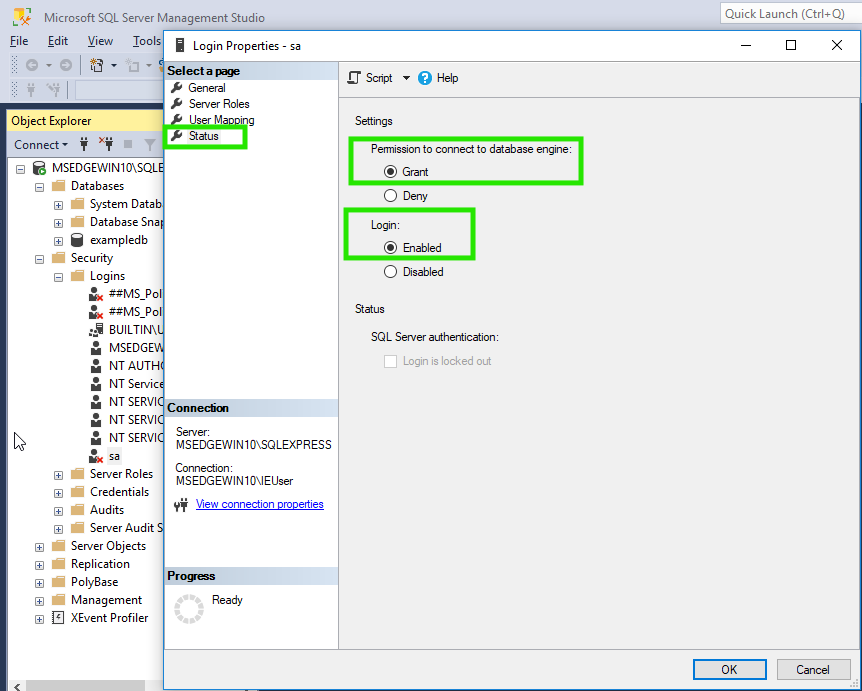
Login Properties Status page with Login enabled and Permission to connect granted
Authentication Setup Complete
With these steps completed, SQL Server Authentication is now enabled and the sa account is ready to use. You can now proceed to configure TCP/IP connections.
Open SQL Server Configuration Manager
First, you need to open SQL Server Configuration Manager:
- Search for "SQL Server Configuration Manager" in the Start menu
- Click on the application to open it
- Alternatively, open C:\Windows\SysWOW64 in File Explorer and locate
SQLServerManagerXX.mscfile where XX is your SQL Server version number (e.g.,SQLServerManager16.mscfor SQL Server 2022,SQLServerManager15.mscfor SQL Server 2019) - Right-click on the file and select "Run as administrator"
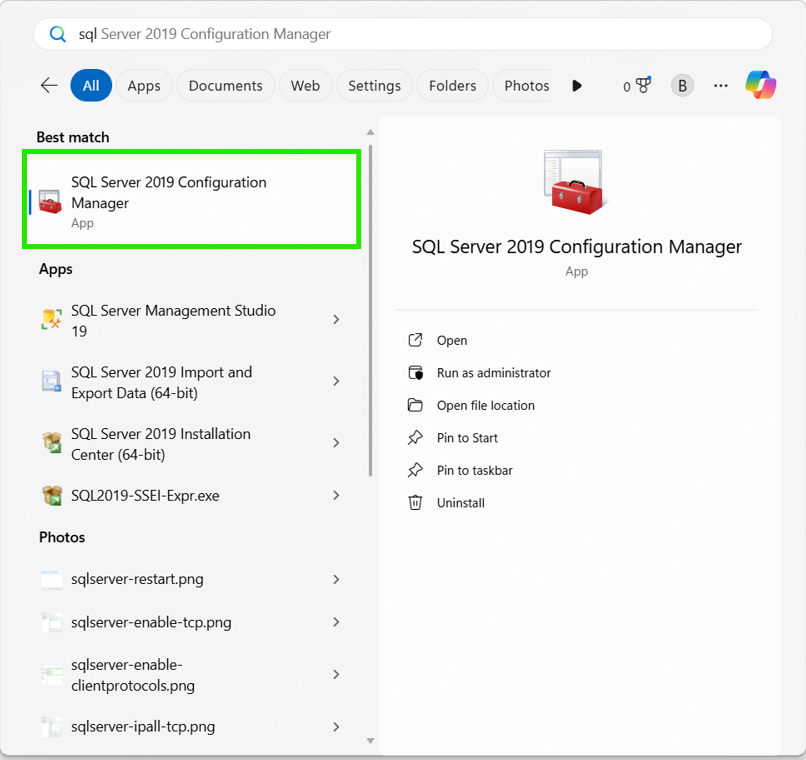
SQL Server Configuration Manager interface
Note
If you can't find SQL Server Configuration Manager, you may need to install it separately. It's available as part of SQL Server Management Studio (SSMS) or as a standalone download from Microsoft.
Enable Client Protocols
Navigate to the Client Protocols section:
- In SQL Server Configuration Manager, expand the tree on the left
- Click on "SQL Native Client Configuration" or "SQL Server Native Client Configuration"
- Click on "Client Protocols"
- In the right pane, you should see a list of protocols including TCP/IP
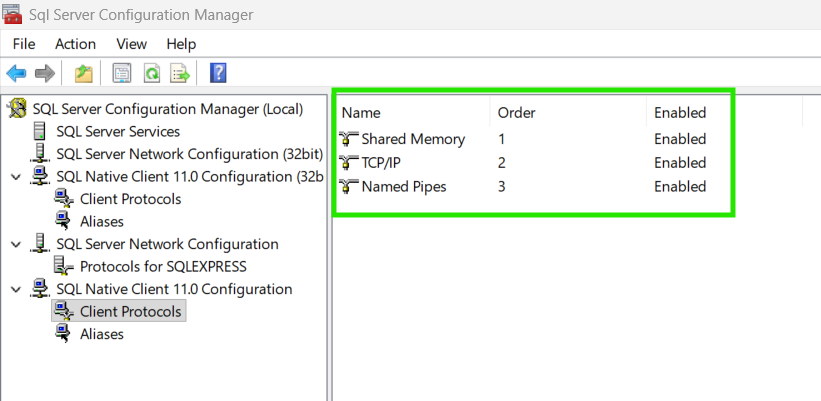
Client Protocols section showing available protocols
This step ensures that SQL Server clients can use TCP/IP to connect. The TCP/IP protocol should be enabled here for client connections to work properly.
Enable TCP/IP Protocol for SQL Server
Now enable TCP/IP for the SQL Server service itself:
- In the left pane, expand "SQL Server Network Configuration"
- Click on "Protocols for [YourInstanceName]" (e.g., "Protocols for SQLEXPRESS")
- In the right pane, find "TCP/IP" in the list of protocols
- Right-click on "TCP/IP" and select "Enable"
- You should see the status change to "Enabled"
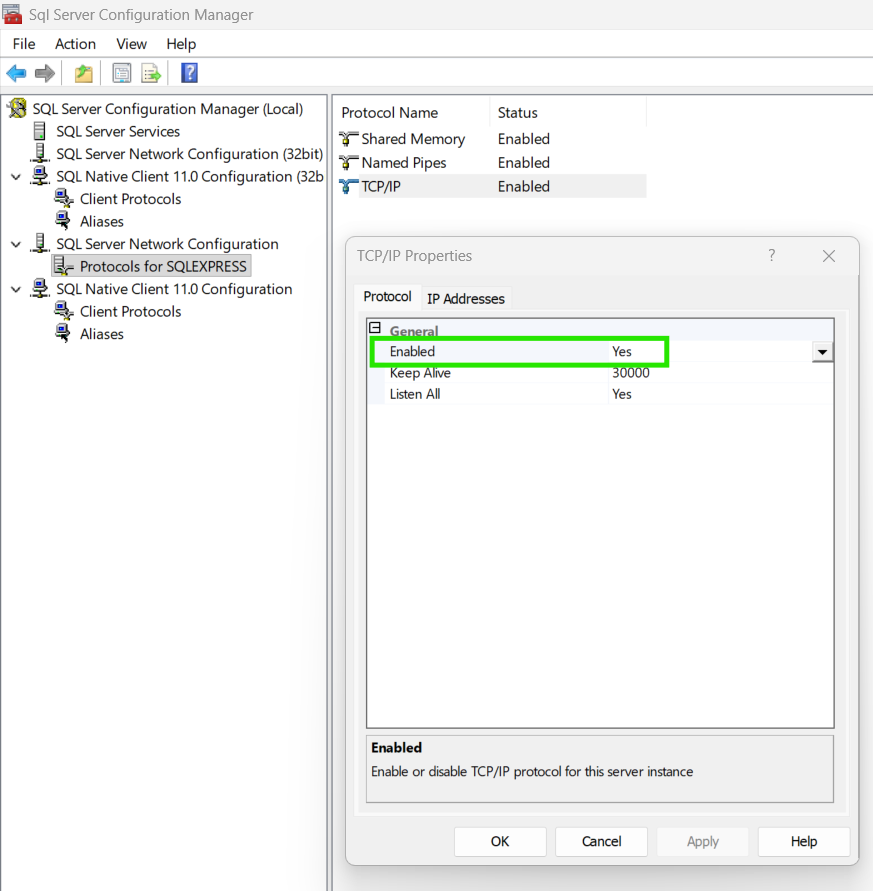
TCP/IP protocol enabled in the protocols list
Success Indicator
When TCP/IP is enabled, you'll see its status change from "Disabled" to "Enabled" in the protocols list.
Configure TCP/IP Port Settings
Configure the TCP/IP port to use port 1433 (the default SQL Server port):
- Right-click on "TCP/IP" and select "Properties"
- Click on the "IP Addresses" tab
- Scroll down to the "IPAll" section at the bottom
- In the "TCP Port" field, enter
1433(or leave it blank to use the default dynamic port) - Clear the "TCP Dynamic Ports" field if you want to use a fixed port (recommended for easier connection)
- Click "OK" to save the changes
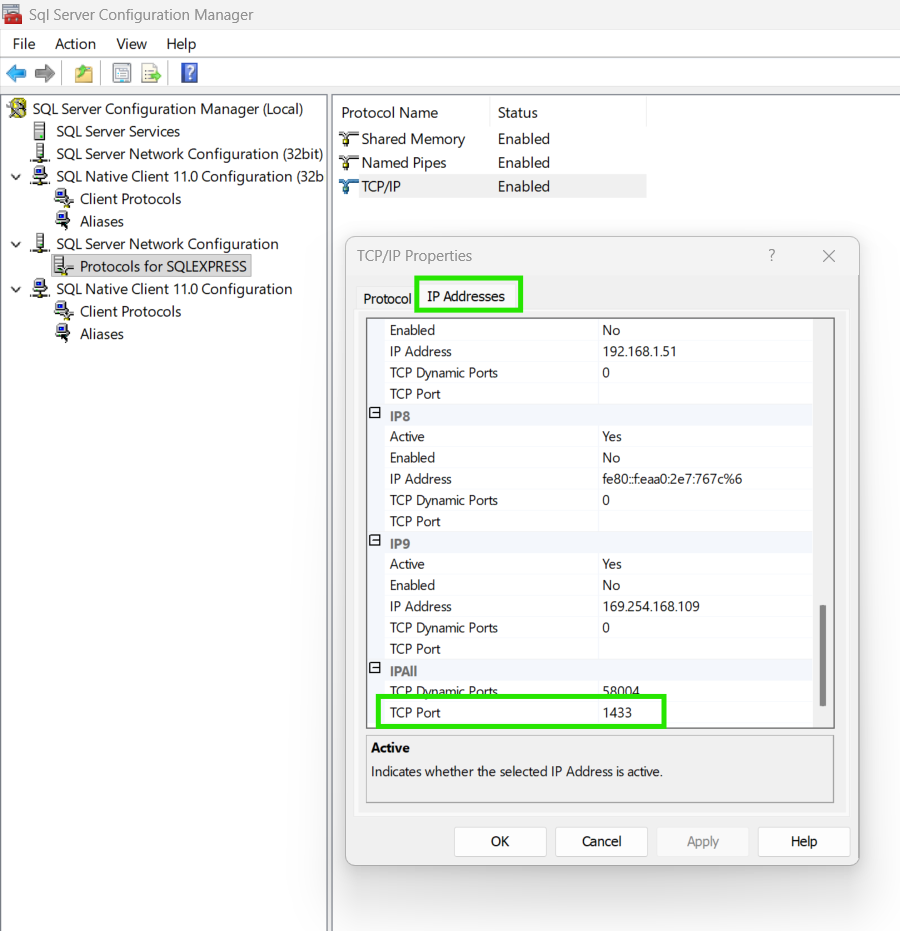
IPAll section with TCP Port set to 1433
Port Configuration Tips
- Port 1433 is the default SQL Server port and is recommended for standard installations
- If port 1433 is already in use, you can choose a different port (e.g., 1434, 1435)
Restart SQL Server Service
For the TCP/IP changes and authentication mode changes (from Step 1) to take effect, you must restart the SQL Server service:
- In SQL Server Configuration Manager, go to "SQL Server Services" in the left pane
- Find your SQL Server instance (e.g., "SQL Server (SQLEXPRESS)")
- Right-click on the service and select "Restart"
- Wait for the service to stop and start again (this may take 30-60 seconds)
- Verify the service status shows as "Running"
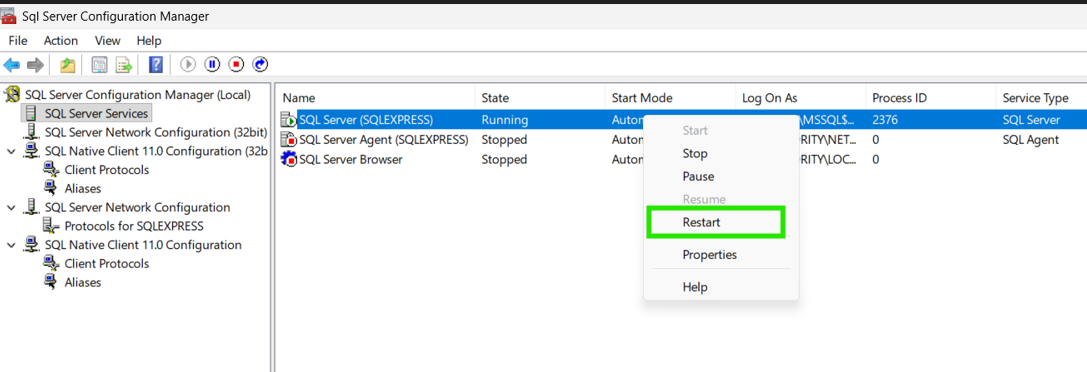
SQL Server service restart option
Service Restart Warning
Restarting the SQL Server service will temporarily disconnect all active database connections. Make sure to:
- Save any unsaved work in applications using the database
- Notify users if this is a shared database
- Plan for a brief downtime (usually 30-60 seconds)
After the service restarts, both SQL Server Authentication (from Step 1) and TCP/IP connections will be enabled and ready to use.
Test Connection in Quemsi
Now verify that the TCP connection works by testing it in Quemsi:
- Open Quemsi web application
- Navigate to the datasource configuration section
- Create a new SQL Server datasource or edit an existing one
- Enter your connection details:
- Server:
localhostor127.0.0.1(or your machine's IP address) - Port:
1433(or the port you configured) - Options:
trustServerCertificate=true(or your instance name) - Database: Your database name
- Authentication: Enter username and password of user you setup with SQL Server Authentication
- Server:
- Click "Test Connection" to verify the connection
- You can click "Save" to save the datasource if you gave the name of the datasource
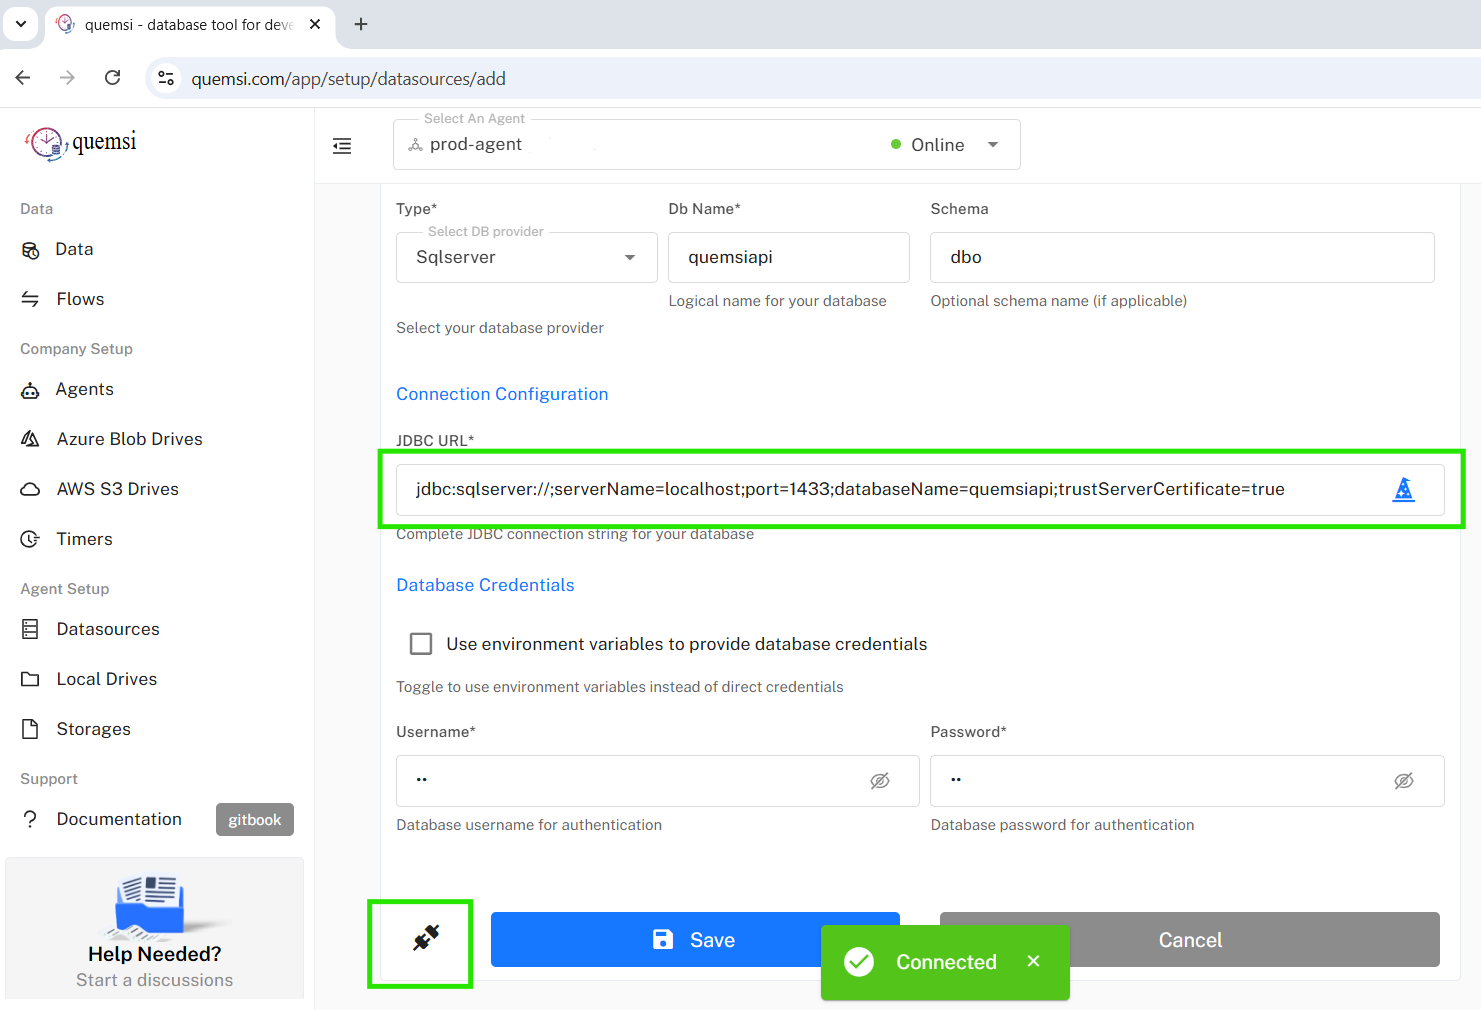
Successful connection test in Quemsi
Connection Success!
If the connection test succeeds, congratulations! Your SQL Server Express instance is now configured to accept TCP/IP connections, and Quemsi can connect to it.
Troubleshooting
If you encounter issues connecting after enabling TCP/IP, try these solutions:
Issue: Connection Timeout or Cannot Connect
Possible causes and solutions:
- SQL Server service not restarted: Make sure you restarted the SQL Server service after enabling TCP/IP. Changes don't take effect until the service is restarted.
- Wrong port number: Verify the port in TCP/IP properties. Check if you're using the correct port in your connection string.
- Firewall blocking: Windows Firewall may be blocking port 1433. Add an inbound rule to allow TCP port 1433.
- SQL Server Browser service: If using named instances, ensure the SQL Server Browser service is running.
Issue: Port Already in Use
If port 1433 is already in use by another application:
- Check what's using the port:
netstat -ano | findstr 1433 - Either stop the conflicting service or configure SQL Server to use a different port
- Update your connection strings to use the new port number
Issue: Windows Firewall Blocking Connections
To allow SQL Server through Windows Firewall:
- Open Windows Defender Firewall with Advanced Security
- Click "Inbound Rules" → "New Rule"
- Select "Port" → "Next"
- Select "TCP" and enter port
1433 - Select "Allow the connection" → "Next"
- Apply to all profiles → "Next"
- Name it "SQL Server TCP 1433" → "Finish"
Issue: SQL Server Authentication Not Enabled
If you're using SQL Server Authentication but getting authentication errors:
- Open SQL Server Management Studio
- Connect using Windows Authentication
- Right-click the server → "Properties"
- Go to "Security" tab
- Select "SQL Server and Windows Authentication mode"
- Click "OK" and restart the SQL Server service
Issue: Cannot Find SQL Server Configuration Manager
If SQL Server Configuration Manager is not installed:
- Download and install SQL Server Management Studio (SSMS), which includes Configuration Manager
- Or download the standalone SQL Server Configuration Manager from Microsoft
- Alternatively, you can use PowerShell commands to enable TCP/IP (advanced)
Still Having Issues?
If you continue to experience problems:
- Check the SQL Server error logs in Event Viewer
- Verify that the SQL Server service is running
- Ensure you have administrator privileges
- Try connecting from the same machine first before testing remote connections
- Review SQL Server documentation for your specific version
Connection String Examples
Once TCP/IP is enabled, you can use these connection string formats:
# Windows Authentication
Server=localhost,1433;Database=YourDatabase;Integrated Security=True;

# SQL Server Authentication
Server=localhost,1433;Database=YourDatabase;User Id=your_username;Password=your_password;

# With instance name
Server=localhost\SQLEXPRESS,1433;Database=YourDatabase;Integrated Security=True;

# Using IP address
Server=127.0.0.1,1433;Database=YourDatabase;Integrated Security=True;
In Quemsi, you'll typically enter these values in separate fields rather than as a connection string, but the underlying connection uses the same TCP/IP protocol.
Ready to Connect Your SQL Server to Quemsi?
Now that TCP/IP is enabled, you can create datasources in Quemsi and start managing your SQL Server databases with powerful backup and restore capabilities.
Get Started Free